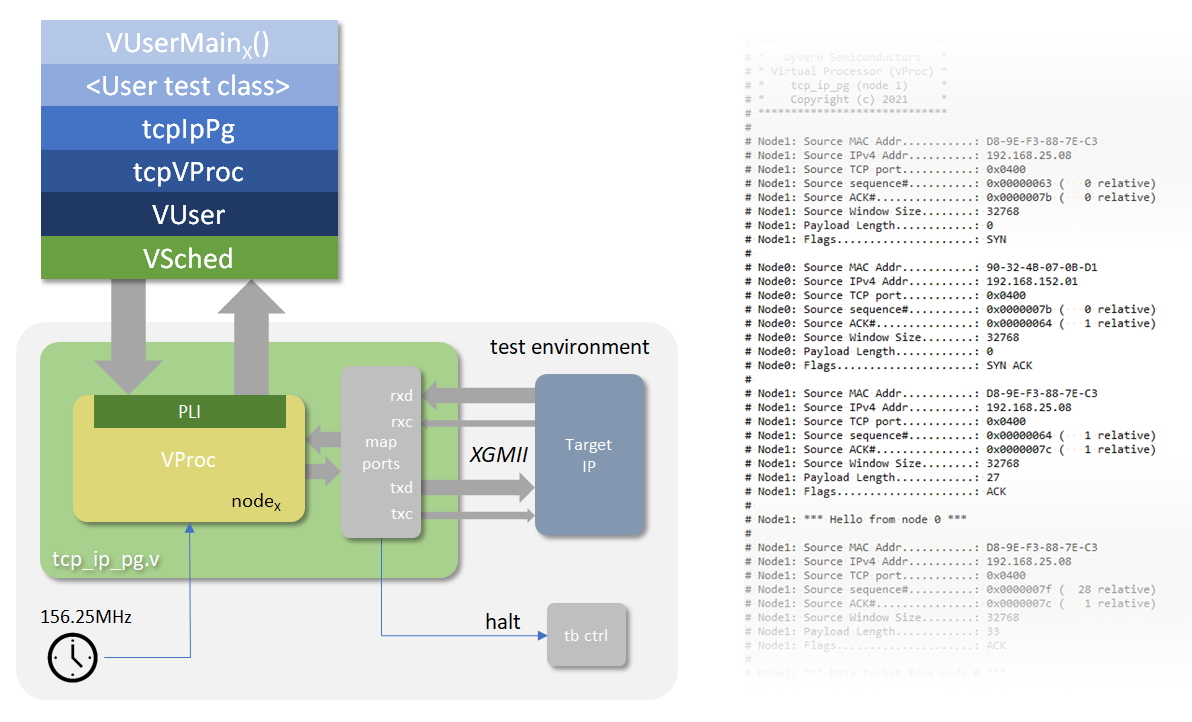
10GbE XGMII TCP/IPv4 packet generator for Verilog and VHDL
The tcpIpPg project is a set of verification IP for generating and receiving 10GbE TCP/IPv4 Ethernet packets over an XGMII interface in a Verilog or VHDL test environment. The generation environment is a set of C++ classes, to generate packets in to a buffer and then send that buffer over the HDL XGMII interface. The connection between the HDL and the C++ domain is done using the Virtual Processor, VProc—a piece of VIP that allows C and C++ code, compiled for the local machine, to run and access the Verilog or VHDL simulation environment, and VProc is freely available on github. It also has a sibling project in the udpIpPg VIP supporting UDP/IPv4 over GbE with a GMII interface and an optional convertor block for RGMII.
The intent for this packet generator is to allow ease of test vector generation when verifying 10G Ethernet logic IP, such as a MAC, and/or a server or client for TCP and IPv4 protocols. The bulk of the functionality is defined in the provided C++ classes, making it easily extensible to allow support for other protocols such as UDP and IPv6. It is also meant to allow exploration of how these protocols function, as an educational vehicle.
An example test environment is provided, for ModelSim, with two packet generators instantiated, connected to one another—one acting as a client and one acting as a server. Connection establishment and disconnection software is provided in the test code to illustrate how packet generation is done, and how to easily build up mode complex and useful patterns of packets. Formatted output of received packets can be displayed during the simulation.
Features
The basic functionality provided is as listed below
A Verilog module or VHDL component, tcp_ip_pg
Clock input, nominally 156.25MHz (10×109 ÷ 64)
XGMII interface, with TX and RX data and control ports
A halt output for use in test bench control
A class to generate a TCP/IPv4 packet into a buffer
A class to send a generated packet over the XGMII interface
A means to receive TCP/IPv4 packets over the XGMII interface and buffer them
A means to display, in a formatted manner, received packets
Connection state machine not part of the packet generation class, but examples provided as part of the test environment (not complete).
A means to request a halt of the simulation (when no more test data to send)
A means to read a clock tick counter from the software
Deep neural networks often suffer from severe performance degradation when tested on images that differ visually from those encountered during training. This degradation is caused by factors such as domain shift, noise, or changes in lighting.
Recent research has focused on domain adaptation techniques to build deep models that can adapt from an annotated source dataset to a target dataset. However, such methods usually require access to downstream training data, which can be challenging to collect.
An alternative approach is Test-Time Adaptation (TTA), which aims to improve the robustness of a pre-trained neural network to a test dataset, potentially by enhancing the network’s predictions on one test sample at a time. Two notable TTA methods for image classification are:
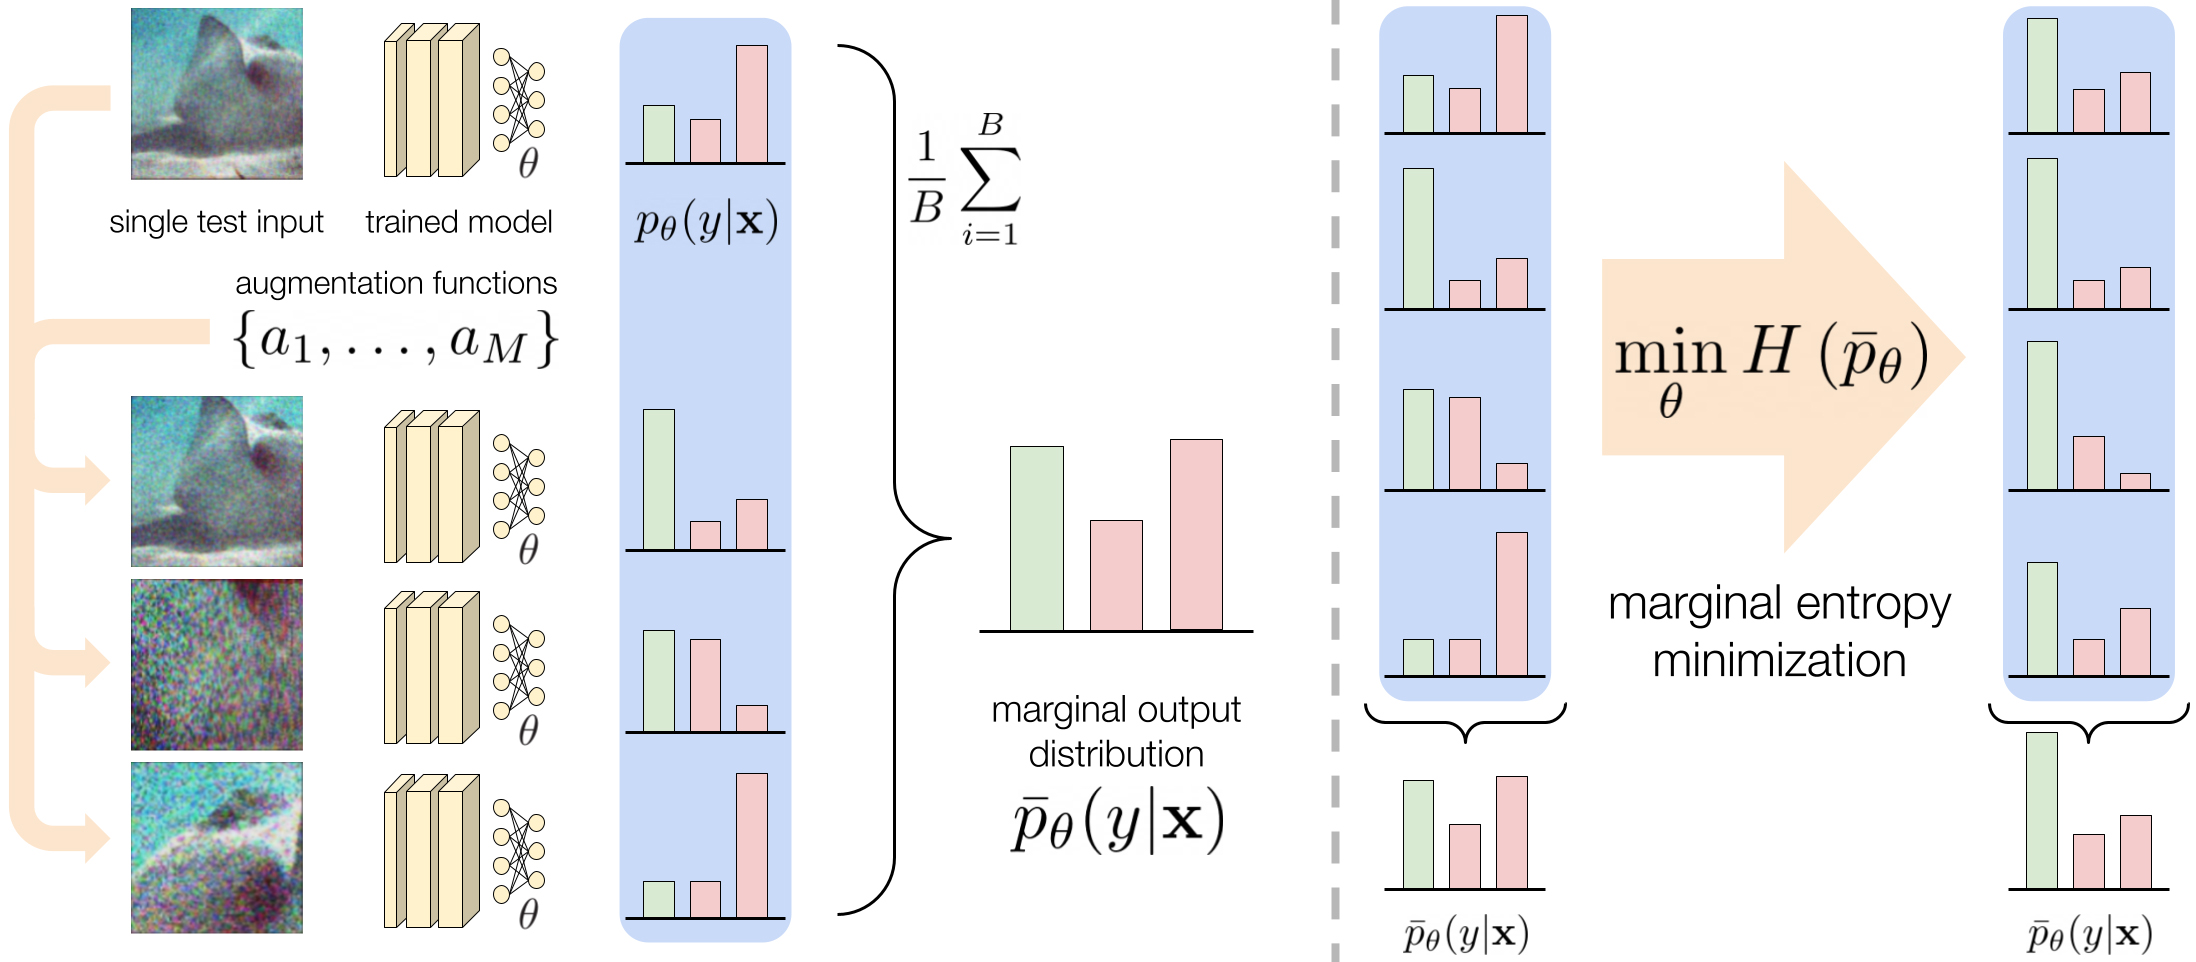
Marginal Entropy Minimization with One test point (MEMO): This method uses pre-trained models directly without making any assumptions about their specific training procedures or architectures, requiring only a single test input for adaptation.
Test-Time Prompt Tuning (TPT): This method leverages pre-existing models without any assumptions about their specific training methods or architectures, enabling adaptation using only a small set of labeled examples from the target domain.
MEMO
For this project, MEMO was applied to a pretrained Convolutional Neural Network, ViT-b/16, using the ImageNetV2 dataset. This network operates as follows: given a test point $x \in X$, it produces a conditional output distribution $p(y|x; w)$ over a set of classes $Y$, and predicts a label $\hat{y}$ as:
Let $ A = {a_1,…,a_M} $ be a set of augmentations (resizing, cropping, color jittering etc…). Each augmentation $ a_i \in A $ can be applied to an input sample $x$, resulting in a transformed sample denoted as $a_i(x)$, as shown in figure. The objective here is to make the model’s prediction invariant to those specific transformations.
MEMO starts by appling a set of $B$ augmentation functions sampled from $A$ to $x$. It then calculates the average, or marginal, output distribution $ \bar{p}(y | x; w) $ by averaging the conditional output distributions over these augmentations, represented as:
Since the true label $y$ is not available during testing, the objective of Test-Time Adaptation (TTA) is twofold: (i) to ensure that the model’s predictions have the same label $y$ across various augmented versions of the test sample, (ii) to increase the confidence in the model’s predictions, given that the augmented versions have the same label. To this end, the model is trained to minimize the entropy of the marginal output distribution across augmentations, defined as:
Do you ever get sick of using the same subnets when you’re designing networks?
Cant decide what ip address range you should use?
Dont want to use the default 192.168.0.1/24 172.16.0.1/12 or 10.0.0.1/8
Want to limit the amount of addresses to suit your use case?
Never fear, I have created this powershell script to fix your indecision.
It prompts for an input of how many ip addresses that you need and then generates a random subnet to fullfil your needs.
Sample Outputs:
Enter the required number of IP addresses for the subnet: 70
Name Value
Starting IP 172.16.139.100
Ending IP 172.16.139.225
Subnet Mask 255.255.255.128
CIDR /25
Usable Addresses 126
Range Type Private
Enter the required number of IP addresses for the subnet: 300
Name Value
Starting IP 10.33.149.50
Ending IP 10.33.151.47
Subnet Mask 255.255.254.0
CIDR /23
Usable Addresses 510
Range Type Private
Enter the required number of IP addresses for the subnet: 600
Name Value
Starting IP 10.47.75.231
Ending IP 10.47.79.228
Subnet Mask 255.255.252.0
CIDR /22
Usable Addresses 1022
Range Type Private
Enter the required number of IP addresses for the subnet: 15000000 (yes that is 15 Million)
Name Value
Starting IP 10.221.110.47
Ending IP 11.221.110.44
Subnet Mask 255.0.0.0
CIDR /8
Usable Addresses 16777214
Range Type Private
Current known issue is if you need more ip address than what private networking allows it will still give a valid range which will of course then not be within the private addressing range.
Is a library that provides a highly customizable CoachmarkView
Demo
Features
The Description Text is rendered dynamically on top or bottom.
The ActionDescriptionText (Text with arrow to the circle) is rendered dynamically left/top/bottom/right with this priority.
Both views can be customized – the library takes inflated views as parameters.
Above described rendering strategy can be replaced by your own implementations or the priority of the available strategies can be changed.
Decide how the button that closes the coachmark should appear (cancel/ok on right side, ok button below description, no button just click to dismiss). It’s also possible to write your own rendering.
All colors and texts can be changed when setting up the Coachmark with the provided Builder.
Decide how the CoachmarkView should appear (NoAnimation or Animation that animates the circle around the clicked view getting smaller until it reaches the clicked view). It’s also possible to write your own startup animation.
Implementation
Add it in your root build.gradle at the end of repositories:
Implementation of RSA key-pair generation, encryption and decryption.
TASK A:
Key Derivation Function (KDF)
Generates an RSA public-private key pair and stores each one to the
corresponding file. The public key is the combination of n-d variables, while
the private key is the n-e combination. The values of n, d, e are assigned by
the appropriate calculations based on the theory, while the random prime numbers
p and q are selected by 2 random positions of a table with prime numbers from 0
to 255, using the sieve of Eratosthenes algorithm.
TASK B:
Data Encryption
Given input file, key file, output file.
First, the variables modulus(n for both private and public key) and exponent(d
for public key and e for private key) extracts from the key file.
Then the input file is read as a plaintext and sent for decryption
using a Modular Exponentiation function, that computes the ciphertext c
providing the appropriate exponent and modulus.
The result is written to the output file name given at the command for encryption.
The length of the ciphertext is plaintext_legth*8.
TASK C:
Data Decryption
Given input file, key file, output file.
In this case, the key file must be the one not used at encryption.
For example, if public.key file is used at encryption of the ciphertext we are
about to decrypt, now we need to provide the private.key file for decryption at
the command.
Like the previous task, the modulus and exponent extract from the key file
in order to be used in the Modular Exponentiation function which is now used in
reverse order of result, as it computes the plaintext (message) m this time.
Since the ciphertext created 8 bytes per 1byte of data in plaintext, the
decrypted message must be 1byte per 8bytes of ciphertext.
The resulted decrypted message is written to the desired output file.
TASK D:
Using the tool
The files provided for encryption were succesfully encrypted and stored to the
required file format.
Parse RSS, Atom, JSON Feed, and HTML into a common JSON format. Complete with XML decoding, HTML sanitization, date standardization, media and metadata extraction.
This project is based on the rbren/rss-parser upgraded to ESM with JSDoc types and the addition of features above.
Install
npm install x-feed-parser
Usage
import{parse}from'x-feed-parser'letrawFeedString// XML (RSS/Atom), JSON Feed, or HTMLconstfeed=parse(rawFeedString)
Running the code above with a valid rawFeedString returns a response with the following schema:
This is a sample skeleton module for use with zend-mvc applications.
Installation
First, decide on a namespace for your new module. For purposes of this README,
we will use MyNewModule.
Clone this repository into your application:
$ cd module
$ git clone https://github.com/zendframework/ZendSkeletonModule MyNewModule
$ cd MyNewModule
If you wish to version the new module with your application, and not as a
separate project, remove the various Git artifacts within it:
$ rm -Rf .git .gitignore
If you want to version it separately, remove the origin remote so you can
specify a new one later:
$ git remote remove origin
The next step will be to change the namespace in the various files. Open each
of config/module.config.php, src/Module.php, and src/Controller/SkeletonController.php, and replace any occurence of ZendSkeletonModule with your new namespace.
find and sed
You can also do this with the Unix utilties find and sed:
$ forphpin$(find . -name '*.php');do> sed --in-place -e 's/ZendSkeletonModule/My-New-Module/g'$php>done
You can rename also the view folder, is require put – on spaces:
mv view/zend-skeleton-module/ resume.pdf
Next, we need to setup autoloading in your application. Open the composer.json
file in your application root, and add an entry under the autoload.psr-4 key:
Finally, notify your application of the module. Open config/modules.config.php, and add it to the bottom of the list:
return [
/* ... */'MyNewModule',
]
application.config.php
If you are using an older version of the skeleton application, you may not
have a modules.config.php file. If that is the case, open config/application.config.php
instead, and add your module under the modules key:


 https://github.com/we-are-ida/jetpack-advanced-drop-targets